

Опис
Optogrid Eyeglasses for WooCommerce transforms your WooCommerce store into a full-featured optical shop. Add a step-by-step lens builder to any product page, capture prescription (Rx) and pupillary distance (PD) data, and integrate with the Optogrid API for digital PD measurement via photo.
The lens builder and manual Rx/PD capture are free. Learn about Optogrid measurement — photo PD measurement, Rx document upload, and operator-verified results delivered back to the order.
Key Features:
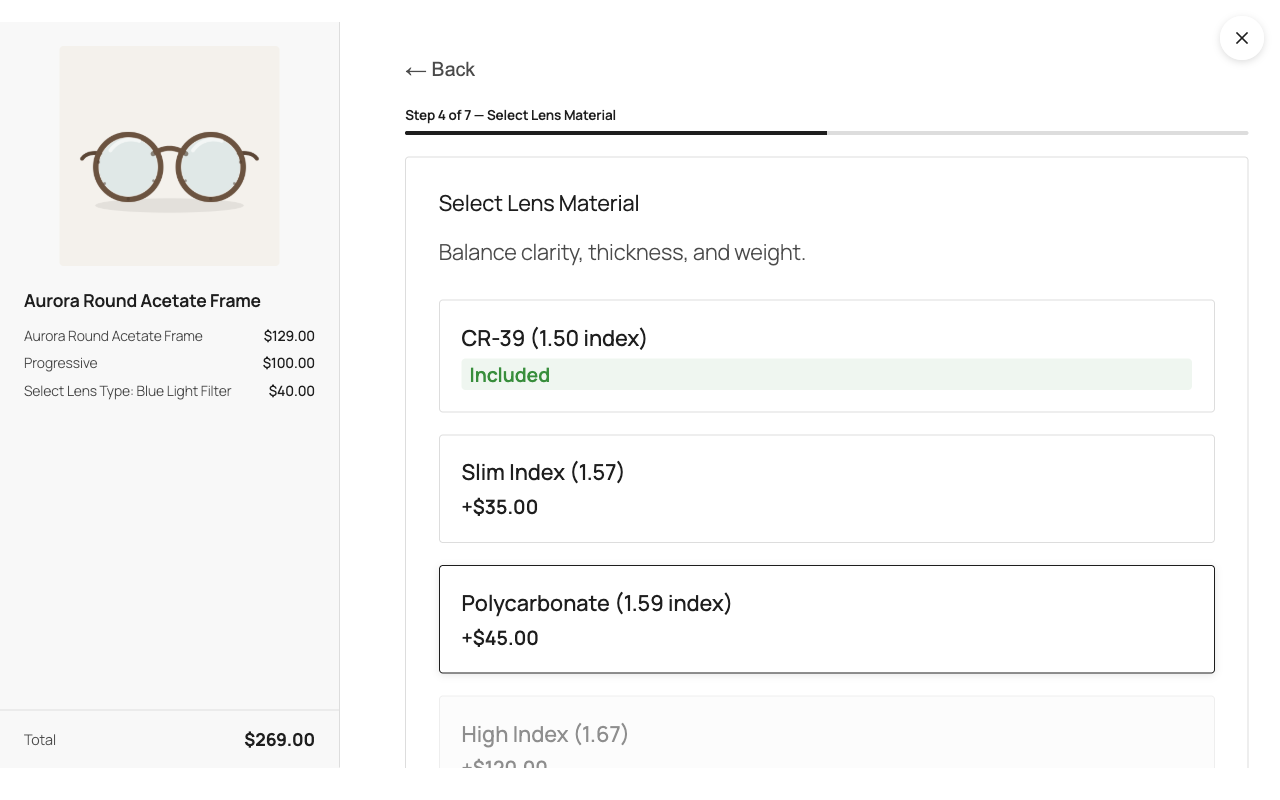
- Configurable Lens Builder — Multi-step UI for lens type, material, coatings, and tints with dynamic pricing.
- Rx Capture — Collect prescription data via form fields, or via document upload with a connected Optogrid account.
- PD Measurement — Manual PD entry or automated measurement via Optogrid photo analysis.
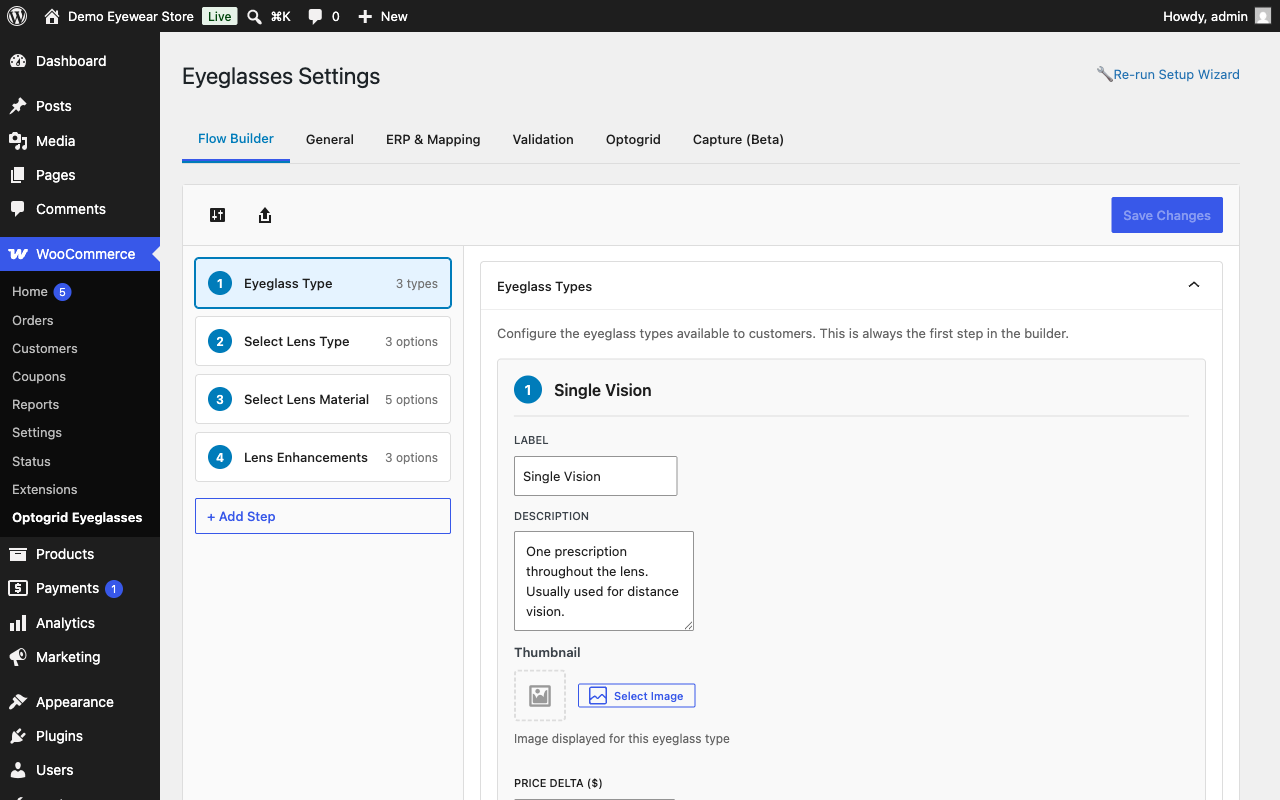
- Visual Flow Builder — Admin interface to configure lens journey steps, options, conditions, and pricing.
- Dynamic Pricing — Real-time price calculation with per-option deltas and formatted breakdowns.
- WooCommerce Integration — Works with cart, checkout, and order management. HPOS compatible.
Merchant Guide
Setup
- Activate the plugin. Until you configure your lens journey, an admin notice prompts you to run the Setup Wizard — or open it directly from WooCommerce > Optogrid Eyeglasses > Settings > Re-run Setup Wizard.
- Pick a preset or configure lens types, materials, and pricing yourself in the Flow Builder tab.
- Choose which products the lens builder appears on: all products, or specific categories/products (Settings > General).
- That’s it for the free tier — no Optogrid account is required. Manual Rx entry and manual PD entry work immediately.
- To add file uploads (prescription documents, PD photos) and photo-based PD measurement, connect an Optogrid account from the Optogrid tab (see „Free vs. paid“ below).
Free vs. paid
Free, no account needed: the full lens builder (types, materials, coatings, tints, dynamic pricing), Rx capture via manual form fields, and manual PD entry. Everything a shopper enters lands on the order and in the admin order-confirmation email, ready for your lab.
Requires a connected Optogrid account: anything that involves a file. Prescription document upload and PD photo capture both store the file on Optogrid’s servers — the plugin has no local storage path for them — and photo-based PD measurement and operator-verified results are performed there. Connect your store from the Optogrid tab in Settings. Until you connect, or if your Optogrid plan does not include measurements, the upload and photo controls are not shown at all and the builder falls back to the manual fields described above — shoppers are never shown a broken or half-finished feature.
Order flow
- The shopper configures their lenses in the builder and provides a prescription (manual fields, or — once connected — a document upload and/or a PD photo).
- At checkout, the plugin persists that data to the order (
Rx/PD Capture Datameta box) and, for photo submissions, schedules a background job to link the upload to the order. - If a PD photo was submitted, the order is moved to a „Pending PD“ status until Optogrid returns a measurement; other orders proceed through your normal WooCommerce statuses unaffected.
- To follow up on a measurement from wp-admin: on the WooCommerce > Orders list, „Pending PD“ appears in the Status column (use the status filter above the list to see every order awaiting measurement). Open the order and the
Rx/PD Capture Databox shows the capture status and a „View in Optogrid“ link that opens the uploaded photo in your Optogrid account, where the measurement is performed. - When the measurement completes, the order’s Rx/PD meta box shows the result and a „View measurement“ link back to Optogrid; the order can then move to your fulfillment/lab stage as usual.
- The admin order-confirmation email also includes the full prescription and PD, so your lab has everything even without opening wp-admin.
Failure recovery
If a submitted PD photo can’t be measured (for example, the photo is blurry or no face is detected), Optogrid reports the reason back to your store as an order note explaining what went wrong. The manually-entered prescription and PD already on the order (if the shopper provided any) are unaffected and still ship with the order.
The shopper is then guided through an automated recovery flow. Your store emails the customer the reason together with a secure, private link (valid for 14 days) where they can retake and re-upload the photo — no login or new checkout required. When Optogrid measures the replacement photo, the order advances automatically, exactly as it would have on the first attempt. From the order screen you can also re-send that link („Request new photo“) or enter the PD yourself („Enter PD manually“) if you’d prefer to resolve it directly.
External Services
This plugin optionally connects to the Optogrid API (https://app.optogrid.com/) for digital pupillary distance (PD) measurement and prescription document storage.
When data is sent to Optogrid:
- Store registration — When a merchant registers their store with Optogrid via the plugin settings. Sends: admin email, store name, store domain, store URL, WooCommerce version, and plugin version. It also registers a webhook URL pointing back to your store (a REST endpoint on your own site) so Optogrid can deliver measurement results.
- PD photo upload — When a customer submits a photo for automated PD measurement.
- Rx document upload — When a customer uploads a prescription document.
- Upload linking — At checkout, upload tokens are exchanged for permanent Optogrid references tied to the order. This call also sends the customer’s email address, the customer’s name, and an internal (non-public) customer identifier used to match repeat customers across orders.
- PD measurement retrieval — When the plugin checks the status or result of a PD measurement.
- Ping — Periodic connectivity checks to verify the Optogrid API is reachable.
- Webhooks — Optogrid sends measurement results back to your store via webhook when PD processing completes.
What the service can send back: responses from Optogrid may carry two fields that change plugin state. (1) A replacement API address, so a connected store follows an Optogrid domain move without the merchant having to reconnect — only https:// addresses are accepted, and while one is in effect an admin notice names it and tells you how to reset it. (2) A service notice (for example a deprecation warning), which is shown as a dismissible admin notice to users with manage_woocommerce; a notice that declares a minimum plugin version this install does not meet is shown as a non-dismissible update prompt until you update. Both fields are escaped before display and neither can execute code.
Before a shopper’s face photo or prescription document is uploaded, the plugin requires the shopper to give explicit consent via a checkbox, and records that consent (with a timestamp) alongside the order.
This feature is optional. The plugin works without an Optogrid account — customers can enter PD values manually and provide prescription data via form fields, and the lens builder, pricing, cart and order integration are unaffected. The Optogrid integration is required only for the features that depend on it: Rx document upload and PD photo upload (the file is stored on Optogrid’s servers; the plugin has no local storage path for it) and the PD measurement performed on those photos.
Source Code
The full, unminified TypeScript/React source for the compiled JavaScript in /build/ is included in the plugin under /src/, together with the build configuration needed to reproduce it: package.json, webpack.config.js and tsconfig.json. Nothing is obfuscated or minified beyond the standard webpack production build.
To rebuild from the shipped files: install pnpm, then run pnpm install followed by pnpm run build in the plugin directory. This regenerates /build/ from /src/ using webpack via @wordpress/scripts.
Developers
The plugin exposes hooks for extending detection, pricing, and the lens journey, plus CSS custom properties for styling. The full reference (all 12 filters and 5 actions with signatures, and every --optowoo-* property) lives in README.md. Highlights:
optogd_is_eyeglasses_product/optogd_product_uses_builder— control whether the builder renders on a product.optogd_lens_price_breakdown— filter the price breakdown to apply merchant discounts/markups. Applied to the charged price (cart/checkout/order). Note: the product-page price preview is computed in the browser and does not reflect this PHP filter, so a change here shows in the cart but not on the live PDP preview.
Multi-currency stores are not fully supported yet. Lens price deltas are converted to the active currency for the charged price (cart/checkout/order via the optogd_convert_lens_delta filter, which integrates with WPML, WOOCS, and Aelia), but the product-page price preview is computed in the browser and always shows base-currency deltas. On a multi-currency store the preview can therefore differ from the amount charged. If you run WPML/WOOCS/Aelia currency switching, test the end-to-end price before going live.
* optogd_journey_config — override the active lens journey at runtime. It runs on every request and is never persisted: the day-long cache stores the unfiltered config, so per-request filter output is never frozen and shared.
* optogd_default_journey_config — override the shipped default journey; applies only when no config is stored (a saved config always wins).
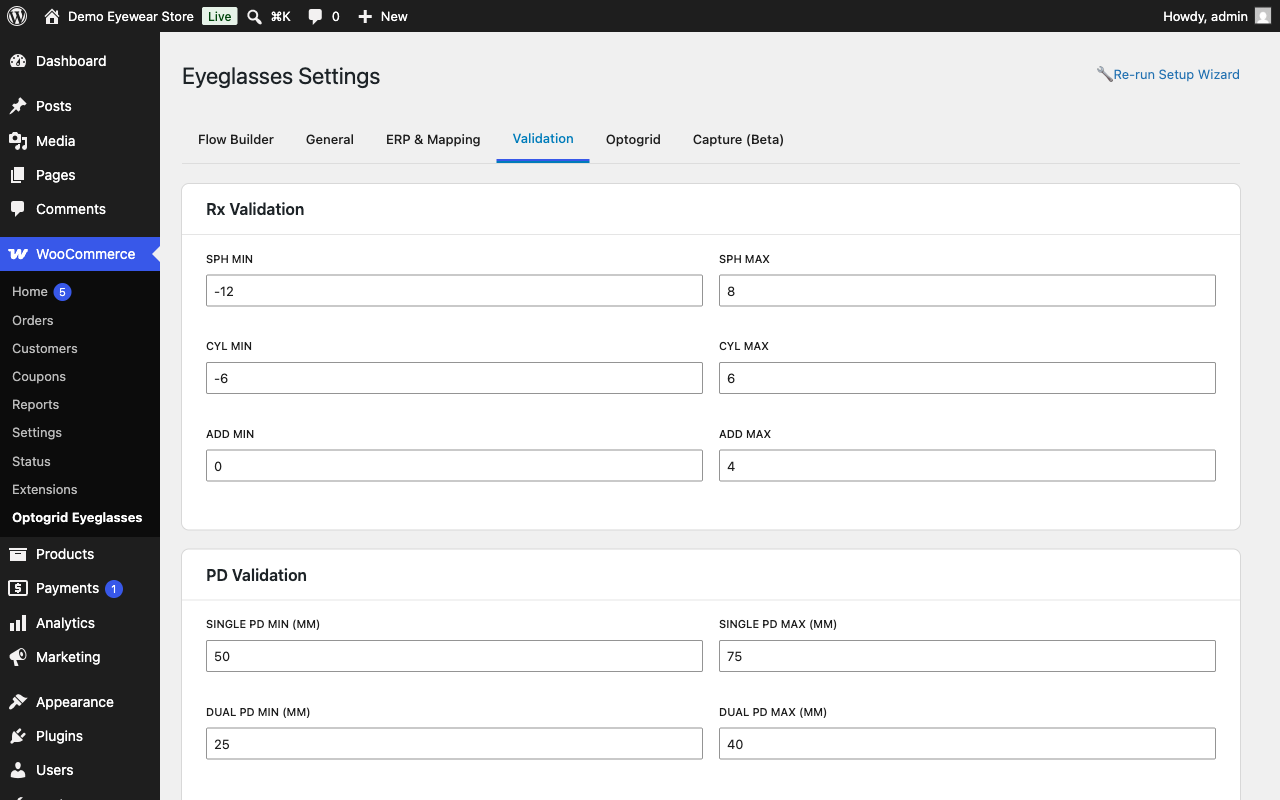
* Saved journey configs are validated for referential integrity: unique step/option/eyeglass-type IDs, and every logic-rule target and condition reference must resolve to an existing step/option.
* Styling: the builder is scoped to .optowoo-extra-options and exposes --optowoo-* custom properties (accent, colors, spacing, borders, transition). Override them by scoping to that container.
Снимци екрана
Постављање
- Upload the
optogrid-eyeglasses-for-woocommercefolder towp-content/plugins/. - Activate the plugin through the ‘Plugins’ menu in WordPress.
- Ensure WooCommerce is installed and active.
- Go to WooCommerce > Optogrid Eyeglasses to configure settings.
- Use the Setup Wizard to get started quickly.
ЧПП
-
Does this plugin require WooCommerce?
-
Yes. WooCommerce 8.0 or later is required.
-
Do I need an Optogrid account?
-
An Optogrid account is only required for the digital PD photo measurement feature. The plugin works without it using manual PD entry and Rx form fields.
-
Is this compatible with WooCommerce HPOS?
-
Yes. The plugin declares full compatibility with WooCommerce High-Performance Order Storage (custom order tables).
-
Does this work with block-based cart and checkout?
-
Yes. The plugin declares compatibility with WooCommerce block-based cart and checkout.
-
Which page builders and themes are supported?
-
The lens builder works on classic WooCommerce themes (hook-based product pages) and on WooCommerce Blocks (Gutenberg) product, cart, and checkout pages. Elementor is supported, including a dedicated integration for the Elementor Pro Single Product „Add to Cart“ widget. Divi, Bricks, and WPBakery are not officially supported yet: on those builders the plugin falls back to a JavaScript injection that may not place the „Select Lens“ button reliably. If your product pages are built with one of these, test on a staging site first.
-
Can customers buy more than one pair, or use product bundles and add-ons?
-
By default, eyeglasses products are sold individually (quantity locked to 1), because each pair is configured with its own prescription and lens options. You can turn this off under WooCommerce > Optogrid Eyeglasses > General („Eyeglasses sold individually“) if you need quantity-based add-ons.
If you also enable ERP lens line items, the plugin adds the lens (and any add-ons) as separate cart lines. When a third-party bundle or composite plugin (such as WooCommerce Product Bundles or Composite Products) is already managing an eyeglasses product, the plugin detects this and does not inject its own child items, to avoid duplicates. Full interoperability with those extensions is not yet officially tested — verify on a staging site.
-
What happens to my data if I uninstall the plugin?
-
Nothing is lost by default. Deleting the plugin removes its settings and Optogrid connection credentials, but preserves all order data — prescriptions, PD measurements, and lens selections stay attached to your orders so your business records remain intact and past orders can still be fulfilled or referenced.
If you want a complete cleanup (for example on a test site), opt in before deleting the plugin by either defining the constant
OPTOGD_REMOVE_ALL_DATAastrueinwp-config.php, or setting the option via WP-CLI:wp option update optogd_erase_all_data_on_uninstall 1. With the opt-in active, uninstalling also erases all order-level plugin data, including customer prescriptions — this cannot be undone.Data previously sent to Optogrid (uploaded photos and measurement records) lives in your Optogrid account and is managed there; uninstalling the plugin does not delete it.
Прегледи
Нема рецензија за овај додатак.
Сарадници и градитељи
„Optogrid Eyeglasses for WooCommerce“ је софтвер отвореног кода. Следећи људи су допринели овом додатку.
Сарадници

Преведите „Optogrid Eyeglasses for WooCommerce“ на свој језик.
Заинтересовани сте за градњу?
Прегледајте код, проверите SVN складиште или се пријавите на белешку градње преко RSS-а.
Белешка о изменама
0.1.5
- Hardening: the two REST routes that cannot use a capability or nonce check — the Optogrid webhook and the tokenized PD re-upload link — now verify their credential (an HMAC-SHA256 signature and an order-bound expiring token) in the route’s permission callback, so an unauthenticated request is rejected before the handler runs.
- Hardening: the builder’s add-to-cart payload is sanitized after JSON decoding, and the nonce carried inside it is sanitized before it reaches wp_verify_nonce().
- Hardening: every remaining variable output in PHP is now escaped at the point of output, including the Rx/PD summary in the admin order email, which carries a shopper-supplied file name.
0.1.4
- Compliance: all plugin CSS and JavaScript is now delivered through the WordPress enqueue API instead of inline tags.
- Docs: corrected the free-vs-paid description. Prescription document upload requires a connected Optogrid account (the document is stored there), which earlier wording incorrectly listed as working without an account. Also documented the two fields the Optogrid service can send back (a replacement API address and a service notice), and the build recipe for reproducing /build/ from the shipped /src/.
- Mock (development) mode is hidden on production installs. It remains available on local, development and staging environments, or by defining OPTOGD_ALLOW_MOCK_IN_PROD.
- Translations are no longer bundled; they are delivered by translate.wordpress.org once available.
- Plugin renamed to „Optogrid Eyeglasses for WooCommerce“.
- Fixed: the lens journey configuration was read on plugins_loaded, which loaded translations before init. On any locale with a translation installed this produced a „translation loading was triggered too early“ notice on every request, and with WP_DEBUG display enabled it could print before headers were sent and block login.
0.1.3
- Security: bind the Optogrid connection to the site it was established on. A staging clone or migrated copy carrying live credentials now pauses all Optogrid calls until it is reconnected on the new address, protecting the original store’s tenant and connection.
0.1.0
- Initial release.
- Configurable multi-step lens builder.
- Rx capture via form fields and document upload.
- PD measurement via manual entry and Optogrid photo analysis.
- Visual flow builder for lens journey configuration.
- Dynamic pricing with per-option deltas.
- WooCommerce HPOS and block checkout compatibility.